allenlu2007

A great WordPress.com site

Month: September, 2017

Ubuntu 16.04 安裝 VNC 及 Mate 桌面環境

by allenlu2007

Reference: 

1. Ubuntu 16.04 安裝 VNC 及 Mate 桌面環境

2. How to Setup A Ubuntu Remote Desktop

3. Ubuntu 16.04 – Add Borders To Windows

4. How do I get a bigger static scrollbar?

5. Ubuntu 16.04 安装 TeamViewer 13

6. Ubuntu安装teamviewer报libqt5x11extras5依赖错误


Summary: Use team viewer instead of VNC!!


Ubuntu 的 windows 有兩個問題:1. Window 沒有邊框;1. Window scroll bar 太窄。

1. 的解法參考 [3].  就是修改 /usr/share/themes/Ambiance/gtk-3.0/apps/unity.css

2. 的解法參考 [4].  就是修改  /usr/share/themes/Ambiance/gtk-3.0/gtk-widgets.css


更好的方法是用 Ubuntu default 的 desktop sharing.  請見 reference 2.

01
of 05
 

How To Share Your Ubuntu Desktop

Share Your Ubuntu Desktop

 Share Your Ubuntu Desktop.

 click on the icon at the top of the Unity Launcher which is the bar down the left side of the screen.

When the Unity Dash appears to start entering the word “Desktop”

An icon will appear with the words “Desktop Sharing” underneath. Click on this icon.

 
02
of 05
 

Setting Up Desktop Sharing

Desktop Sharing

The desktop sharing interface is broken down into three sections:

  1. Sharing
  2. Security
  3. Show notification area icon

Sharing

The sharing section has two available options:

  1. Allow other users to view your desktop
  2. Allow other users to control your desktop

If you wish to show another person something on your computer but you don’t want them to be able to make changes then just tick the “allow other users to view your desktop” option.

If you know the person who is going to be connecting to your computer or indeed it is going to be you from another location tick both boxes.

Warning: Do not allow somebody you do not know to have control over your desktop as they can damage your system and delete your files. 

Security

The security section has three available options:

  1. You must confirm each access to this machine
  2. Require the user to enter this password
  3. Automatically configure UPnP router to open and forward ports

If you are setting up the desktop sharing so that other people can connect to your computer to show them your screen then you should check the box for “you must confirm each access to this machine”. This means you know exactly how many people are connecting to your computer. 

If you intend to connect to the computer from another destination yourself then you should make sure the “you must confirm each access to this machine” does not have a tick in it. If you are elsewhere then you won’t be around to confirm the connection.

Whatever your reason for setting up desktop sharing you should definitely set a password. Place a tick in the “Require the user to use this password” box and then enter the best password you can think of into the space provided.

The third option deals with accessing the computer from outside your network. By default your home router will be set up to only allow other computers connected to that router to know about the other computers and devices connected to that network. To connect from the outside world your router needs to open a port to allow that computer to join the network and have access to the computer your are trying to connect to.

Some routers allow you to configure this within Ubuntu and if you intend to connect from outside your network it is worth placing a tick into the “Automatically configure UPnP router to open and forward ports”.

Show Notifications Area Icon

The notification area is in the top right corner of your Ubuntu desktop. You can configure the desktop sharing to show an icon to show it is running.

The options available are as follows:

  1. Always
  2. Only when someone is connected
  3. Never

如果選擇“always”選項,則會出現一個圖標,直到您關閉桌面共享。如果您選擇“Only when someone is connected”時,圖標才會出現,如果有人連接到電腦。最後的選擇是”never”顯示圖標。

After setting up the VNC server, just close the utility.

3.) Disable encryption.

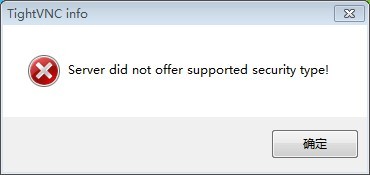
Due to this bug, the common used TigerVNC, TightVNC viewer does not support vino’s security type. You’ll get the error below when you try to connect:

security-notsupported

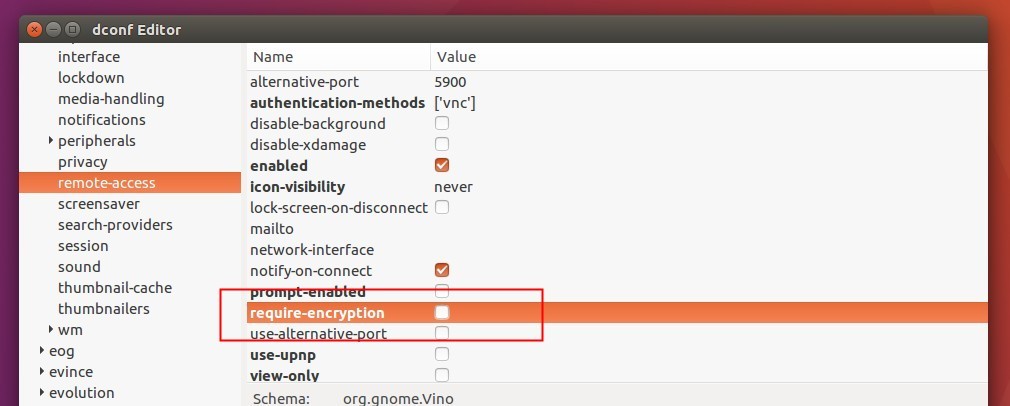
A workaround is to disable encryption requirement. To do so, install dconf Editor from Ubuntu Software (or via sudo apt install dconf-editor command in terminal), and launch it.

When it opens, navigate to org -> gnome -> desktop -> remote-access, and uncheck the value of 「require-encryption」 in right.

vino disable encryption

Finally connect to this desktop on remote machine by typing the IP and password using a VNC client!


Teamviewer Install

Why teamviewer? VNC is too slow and cannot across WAN.

1. Download team viewer deb from web site.

2. Sudo dpkg -I teamviewer_13xxx_amd64.deb

3. Find error =>

sudo apt-get install -f 


Deep Learning Machine on Ubuntu LTS 16.04 with GTX 1080

by allenlu2007

本文聚焦在 Ubuntu LTS 16.04 with GTX1080 GPU deep learning 軟體設定。

Reference: 

[1] tflearn: http://tflearn.org/examples/

[2] https://standbymesss.blogspot.tw/2016/09/ubuntu-1404-caffe-cuda-75-opencv-31.html -> good reference

[bootable USB stick]

[3] “Create a bootable USB stick on Ubuntu

[4] “Create a bootable USB stick on Windows (Rufus)”


Step -1: Install Ubuntu LTS 16.04

Why Choose 16.04?  Tensorflow/CUDA/Android Studio trade-off

* Use USB booting to install Ubuntu 16.04

If host is windows, use Rufus [4].  If host is Ubuntu, see [3].

* Choose Ubuntu 16.04 desktop version. 

=> Check the update and 3rd party during the installation 

=> use others option and choose mount point / and format the partition

After successful installing Ubuntu 16.04

* Setup -> software update —> additional driver —> GTX 1080 —> choose Nvidia driver xxx to install Nvidia driver instead of using Xorg driver.

 這步似乎可以省略。之後 install CUDA10 會自動用 nvidia 最新的  driver.

$ sudo apt-get update

$ sudo apt-get upgrade 


Step -0.5: Install Matlab

Reference: Linux MATLAB 2018a installation

$ sudo mkdir /mnt/matlab

$ sudo mount -o loop R2018a_glnxa64_dvd1.iso /mnt/matlab

$ cd /mnt/

$ sudo /mnt/matlab/install 

等到安裝到 60% 會提示插入第二張 CD, 執行:

$ sudo mount -o loop R2018a_glnxa64_dvd2.iso /mnt/matlab

之後就 follow readme.txt 的 instruction.

Matlab 此時會使用 GTX 1080.


Step 0: Install emacs, git, and enable desktop sharing (vnc)

* sudo apt install emacs

* sudo apt install git

* vnc 可以參考下文。==> change to the following reference using ubuntu default desktop sharing!

How to Remote Access to Ubuntu 16.04 from Windows

=> use team viewer is better!!!


* Change locale 去除星期的中文字 

ps. edit /etc/default/locale to change the date format from lzh_TW -> en_US.UTF-8


Step 1: Install Ubuntu (LTS 16.04) Nvidia driver

Reference: 

1.2. ls /usr/localls   : CUDA

1.3. http://docs.nvidia.com/deeplearning/sdk/cudnn-install/index.html:cudnn


Step 2: Install Nvidia CUDA and cuDNN

Reference:

* CUDA 8.0 -> CUDA 10.1 (2019/3/1) -> CUDA 10.0 (3/8)

CUDA10.1 is too new to be compatible with tensor flow1.13!

Use CUDA10.0 instead

  1. sudo dpkg -i cuda-repo-ubuntu1604_8.0.61-1_amd64.deb
  2. sudo apt-get update
  3. sudo apt-get install cuda
  4. sudo dpkg -i cuda-repo-ubuntu1604-8-0-local-cublas-performance-update_8.0.61-1_amd64.deb 

$nvcc —version (may need to do   $sudo apt install nvidia-cuds-toolkit

$nvidia-smi

NewImage

Setup environment variables

export CUDA_HOME=/usr/local/cuda-8.0 
export LD_LIBRARY_PATH=${CUDA_HOME}/lib64 
 
PATH=${CUDA_HOME}/bin:${PATH} 
export PATH


* cuDNN: 6.0 -> 7.5 (2019/3/1)

  • Navigate to your <cudnnpath> directory containing cuDNN Debian file.
  • Install the runtime library, for example:
    sudo dpkg -i libcudnn7_7.0.2.43-1+cuda9.0_amd64.deb
  • Install the developer library, for example:
    sudo dpkg -i libcudnn7-dev_7.0.2.43-1+cuda9.0_amd64.deb
  • Install the code samples and the cuDNN Library User Guide, for example:
    sudo dpkg -i libcudnn7-doc_7.0.2.43-1+cuda9.0_amd64.deb

注意在 install cuDNN 後,依照 Nvidia cuDNN installation guide (reference 3) compile mnistCUDNN example.

遇到以下錯誤。


Can not use cuDNN on context None: cannot compile with cuDNN. We got this error: In file included from /usr/local/cuda-8.0/include/channel_descriptor.h:62:0, from /usr/local/cuda-8.0/include/cuda_runtime.h:90, from /usr/include/cudnn.h:64, from /tmp/try_flags_F2eFMF.c:4: /usr/local/cuda-8.0/include/cuda_runtime_api.h:1628:101: error: use of enum 『cudaDeviceP2PAttr' without previous declaration extern __host__ __cudart_builtin__ cudaError_t CUDARTAPI cudaDeviceGetP2PAttribute(int *value, enum cudaDeviceP2PAttr attr, int srcDevice, int dstDevice); ^

參考 https://github.com/Theano/Theano/issues/5856 解決這個問題。

Open the file:
/usr/include/cudnn.h

And try change the line:
#include “driver_types.h”

to:
#include <driver_types.h>

-------------------------------- 

在 2.3.1 installing from a Tar File.

Copy the following files into the CUDA Toolkit directory.

$ sudo cp cuda/include/cudnn.h /usr/local/cuda/include

$ sudo cp cuda/lib64/libcudnn* /usr/local/cuda/lib64

$ sudo chmod a+r /usr/local/cuda/include/cudnn.h /usr/local/cuda/lib64/libcudnn*

不過用 2.3.2 installing from a Debian File (as I did).  在以上目錄 (/usr/local/cuda/include and lib) 卻找不到 cudnn or libcudnn files.

反而是在 /usr/include/x86_64-linux-gnu/include and lib, why?

NewImage


Step 3: Install Anaconda python, OpenCV, and Caffe and Caffe2

https://standbymesss.blogspot.tw/2016/09/ubuntu-1404-caffe-cuda-75-opencv-31.html

$ sudo apt-get install libprotobuf-dev libleveldb-dev libsnappy-dev libopencv-dev libhdf5-serial-dev protobuf-compiler
$ sudo apt-get install --no-install-recommends libboost-all-dev
$ sudo apt-get install libgflags-dev libgoogle-glog-dev liblmdb-dev
Install Atlas
 sudo apt-get install libatlas-base-dev

Step 3.1 Install Anaconda Python

Download anaconda2, use python 2.7.13 for caffe compatibility

$ bash Anaconda2-4.0.0-Linux-x86_64.sh

Download anaconda3, use python 3.7 but create 3.6 for tensorflow.

Step 3.2 Install OpenCV (2018/12/1 => 請參考後文)

參考 https://standbymesss.blogspot.tw/2016/09/ubuntu-1404-caffe-cuda-75-opencv-31.html

$ sudo apt-get install cmake git libgtk2.0-dev pkg-config libavcodec-dev libavformat-dev libswscale-dev
$ unzip opencv-3.3.0.zip
$ cd  opencv-3.1.0/ $ mkdir release $ cd release $ cmake -DBUILD_TIFF=ON  -DENABLE_AVX=ON -DWITH_OPENGL=ON -DWITH_OPENCL=ON -DWITH_IPP=ON -DWITH_TBB=ON -DWITH_EIGEN=ON -DWITH_V4L=ON  -DCMAKE_BUILD_TYPE=RELEASE -DCMAKE_INSTALL_PREFIX=$(python -c "import sys; print(sys.prefix)")-DPYTHON_EXECUTABLE=$(which python)-DPYTHON_INCLUDE_DIR=$(python -c "from distutils.sysconfig import get_python_inc; print(get_python_inc())")-DPYTHON_PACKAGES_PATH=$(python -c "from distutils.sysconfig import get_python_lib; print(get_python_lib())")..
$ make -j8

test opencv

a. run python and do “import cv2″

b. using ./python/python demo.py

我遇到問題是 

GLib-GIO-Message:Using the 'memory'GSettings backend.

export GIO_EXTRA_MODULES=/usr/lib/x86_64-linux-gnu/gio/modules/


Step 3.2 Install caffe

git download caffe.

cd caffe directory.

$ cd python

$ for req in $(cat requirements.txt);do pip install $req;done

$ cd ..

$ cp Makefile.config.example Makefile.config

Modify Makefile.config based on the reference.

$make all -j8

$make test -j8

all OK

$make runtest -j8

encounter library libhdf5_hl_so.8 problem!!

Add ${ANACONDA2}/lib path to LD_LIBRARY_PATH to solve this problem.

NewImage


pycaffe

make python


Step 3.3 Install caffe2

# for Ubuntu 16.04
sudo apt-get install -y --no-install-recommends libgflags-dev


# for both Ubuntu 14.04 and 16.04
sudo apt-get install -y --no-install-recommends \
      libgtest-dev \
      libiomp-dev \
      libleveldb-dev \
      liblmdb-dev \
      libopencv-dev \
      libopenmpi-dev \
      libsnappy-dev \
      openmpi-bin \
      openmpi-doc \
      python-pydot
sudo pip install \
      flask \
      future \
      graphviz \
      hypothesis \
      jupyter \
      matplotlib \
      pydot python-nvd3 \
      pyyaml \
      requests \
      scikit-image \
      scipy \
      setuptools \
      six \
      tornado

 git clone –recursive https://github.com/caffe2/caffe2.git && cd caffe2

make &&cd build && sudo make install

python -c ‘from caffe2.python import core’ 2>/dev/null &&echo“Success”||echo“Failure”


python -m caffe2.python.operator_test.relu_op_test


Step 4: Install TensorFlow

https://blog.csdn.net/hgdwdtt/article/details/78633232

sudo apt-get install libcupti-dev

conda create -n tensorflow python=3.6

source activate tensorflow


Cuda-10.1 seems not supported by tensorflow-gpu.

Need to compile from source : difficult and not recommend


pip install —upgrade tensorflow-gpu

 Got the following error message!!

_mod = imp.load_module(‘_pywrap_tensorflow_internal’, fp, pathname, description)
File “/home/alu/anaconda3/envs/tensorflow/lib/python3.6/imp.py”, line 243, in load_module
return load_dynamic(name, filename, file)
File “/home/alu/anaconda3/envs/tensorflow/lib/python3.6/imp.py”, line 343, in load_dynamic
return _load(spec)
ImportError: libcublas.so.10.0: cannot open shared object file: No such file or directory


Solve this problem by installing cuda10.0.! 


Install Keras

Pip install keras


Install PytTorch

conda install pytorch torchvision cudatoolkit=10.0 -c pytorch


Step 5: Install MXNET

pip install mxnet-cu80==0.11.0

主要是用來 run mtcnn for face detection.


Step 5: install tflearn

pip install tflearn or condo install tflearn?


Step 6: install caffe/caffe2? to run faster R-CNN 

Reference:  

  • 2. caffe Ubuntu 16.04 or 15.10 Installation Guide
  • 需要 compile from source code.  可能要先用 GCP without CPU 走過一次。
  • 另外 caffe 最好是用 python 2.7.
  • > conda create -n y27 python=2.7 anaconda
  • pip install –ignore-installed —upgrade 
    https://storage.googleapis.com/tensorflow/linux/gpu/tensorflow_gpu-1.3.0-cp27-none-linux_x86_64.whl
  •  


$ sudo mkdir /mnt/matlab$ sudo mount -o loop R2018a_glnxa64_dvd1.iso /mnt/matlab$ cd /mnt/$ sudo ./mnt/matlab/install

Deep Learning Machine on Windows 10

by allenlu2007

本文聚焦在 Windows 10 with GTX1080 GPU deep learning 軟體設定。

Reference:

tflearn: http://tflearn.org/examples/

Step 1: Install Nvidia driver on win 10.

Step 2: Install Nvidia CUDA and cuDNN

…. add later.

Step 3: Install Anaconda (4.4.0)

Step 4: Use anaconda shell prompt to install tensorflow

Step 5: install tflearn

Ref: https://github.com/tflearn/tflearn/issues/539

5.1: Then go to http://www.lfd.uci.edu/~gohlke/pythonlibs/#curses download curses‑2.2‑cp36‑none‑win_amd64.whl file and run pip install curses‑2.2‑cp36‑none‑win_amd64.whl command in local folder.

5.2: pip install tflearn


Deep Learning Machine Software Setup

by allenlu2007

本文聚焦在 CPU only (no GPU) deep learning 軟體設定。

Step 0:  Create GCP VM

OS 建議用 Ubuntu LTS 16.04 (or 14.04).   (Persistent disk) HDD 建議用 60GB.  RAM 建議用 6.5GB (max in GCP). 

image

Step 1:  Install TensorFlow

我們先從 Google tensorflow installation 反推:

https://www.tensorflow.org/versions/r0.12/get_started/os_setup

We support different ways to install TensorFlow:

  • Pip install: Install TensorFlow on your machine, possibly upgrading previously installed Python packages. May impact existing Python programs on your machine.
  • Virtualenv install: Install TensorFlow in its own directory, not impacting any existing Python programs on your machine.
  • Anaconda install: Install TensorFlow in its own environment for those running the Anaconda Python distribution. Does not impact existing Python programs on your machine.
  • Docker install: Run TensorFlow in a Docker container isolated from all other programs on your machine.
  • Installing from sources: Install TensorFlow by building a pip wheel that you then install using pip.

根據我的經驗,使用 Anaconda install 大概是問題最小的方式。同時一次解決 python and tensorflow installations.

$ sudo apt-get update

$sudo apt-get upgrade

Install Anaconda: (建議先用 python 3.6)

Follow the instructions on the Anaconda download site.

Create a conda environment called tensorflow:

> mkdir downloads

> cd downloads

> wget http://repo.continuum.io/archive/Anaconda3-4.4.0-Linux-x86_64.sh

> bash Anaconda3-4.3.1-Linux-x86_64.sh

# Python 3.6

$ conda create –n tensorflow python=3.6

$ source activate tensorflow

(tensorflow)$  # Your prompt should change

# Linux/Mac OS X, Python 2.7/3.4/3.5/3.6, CPU only:

(tensorflow)$ conda install -c conda-forge tensorflow

下一步是確認 tensorflow 是否 ok.

>>> import tensorflow as tf

>>> hello = tf.constant(‘Hello, TensorFlow!’)

>>> sess = tf.Session()

>>> sess = tf.Session()

>>> print(sess.run(hello))

2017-09-03 13:10:50.101098: W tensorflow/core/platform/cpu_feature_guard.cc:45] The TensorFlow library wasn’t compiled to use SSE4.1 instructions, but these are available on your machine and could speed up CPU computations.

2017-09-03 13:10:50.101130: W tensorflow/core/platform/cpu_feature_guard.cc:45] The TensorFlow library wasn’t compiled to use SSE4.2 instructions, but these are available on your machine and could speed up CPU computations.

2017-09-03 13:10:50.101137: W tensorflow/core/platform/cpu_feature_guard.cc:45] The TensorFlow library wasn’t compiled to use AVX instructions, but these are available on your machine and could speed up CPU computations.

Step 2:  Install TFlearn and TensorLayer and Keras

pip install tflearn

pip install tensorlayer

pip install keras